| Home | Downloads | Order | Contact Us | Mailing Lists |
|
Products |
|
|
Totally Free Software |
|
|
User
Comments |
|
|
GENMatcher GENViewer |
| GENViewer Tips |
|
This section includes some tips to help you understand some of GENViewer's
features. For more information, download the
user manual, which is in Adobe PDF format.
GENViewer Tips
Using AND/OR Conditions to Search For Individuals on Your Computer
Using AND/OR Conditions to Highlight Individuals GENViewer allows you to easily highlight individuals in a genealogy data file. The purpose for highlighting is to help analyze individuals. The following examples describe how this is done. For a list of all available highlighting conditions, download the GENViewer User Manual and look for "Highlighting Conditions Overview." To highlight individuals: on the main toolbar, click Highlighting Panel
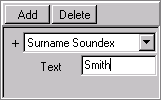
Example 1 - Highlight individuals that haves the surname soundex for "Smith" This condition highlights in yellow all individuals that have a surname
that matches the soundex value of the text "Smith". Highlighted
individuals are listed on the Highlighted tab in addition to being
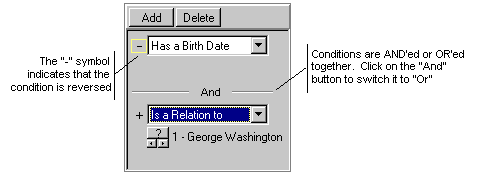
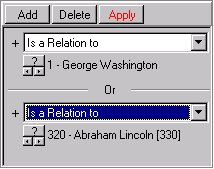
highlighted on the other tab views. Example 2 - Highlight individuals with a birth date AND are related to George Washington This example uses 2 conditions and they are logically AND'ed together. Conditions can be AND'ed or OR'ed. You can toggle between these two logical conditions by clicking on the "And" or "Or" text. Clicking on "-", the condition "Has No Birth Date" has changed to "Has a Birth Date". This is indicated with the "+" and "-" symbols next to the condition, where "-" represents a logical NOT of the condition. Highlighted individuals are listed on the Highlighted tab
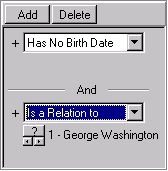
in addition to being highlighted on the other tab views. Example 3 - Highlight individuals with no birth date AND are related to George Washington This are the same conditions as in Example 3 except that the first condition is set to "Has No Birth Date". Highlighted individuals are listed on the Highlighted tab
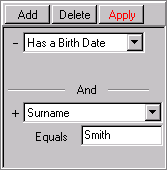
in addition to being highlighted on the other tab views. Example 4 - Highlight individuals that have no birth date AND have surname name Smith This example displays the Apply button feature that can be turned using the . By default, as you make changes to your highlighting conditions, GENViewer displays the individuals that are highlighted. Depending on the speed of your computer and the size of the genealogy file, this might take a few seconds to a minute. This option allows you to make changes to your highlighting condition(s) and then apply it to your data file. A red apply button indicates that the user has made a change to the highlighting condition(s). Pressing this button will apply the condition(s) to your data file, and the button will return to normal color.
In this example, the logical OR value is used.
Finding Islands of Individuals Within a genealogy file, an island is a group of individuals and families that are all related to each other either by blood or by marriage. The Islands panel is used to view the individuals, families, notes, and sources contained in any islands found in the data file. It displays the same information found in the Islands tab. However, it has a check box called Use Islands that when checked, will limit GENViewer to only display the individuals found in the island that is selected on the Islands panel. This allows you to analyze individuals and families in an island. For example, in the sample GEDCOM "US presidents.ged", which
is included when you download GENViewer,
each President's genealogy represents an Island of individuals and families
because each president is not related to the others. Therefore, if you select Use
Islands and select the row in the table that is Lincoln's genealogy, you
will only see his relatives on GENViewer's screens - the other individuals
that are contained in other islands will not be displayed. Exporting Islands to GEDCOM files GENViewer can export each of the islands to a separate GEDCOM file. Note: this feature only works while viewing a GEDCOM file.
Making
Self-Viewing GEDCOMs
Scenario 1 - Sending genealogy information to a family member Suppose that you are the one that is doing the family genealogy. You reach a point where you require other family members to review your work and make comments and corrections. However, some your family members are NOT into genealogy and don't have any genealogy software to use. You have a few options:
Scenario 2 - Bring your genealogy Information to a Family History Center (FHC) Family History Centers run by The Church of Jesus Christ of Latter-day Saints have computers that have PAF installed on them. If you use PAF, you can bring your PAF database with you and load it into the computer. However, you must be careful not to leave your PAF file on the computer. Also, this only works if you use PAF. If you create a self-viewing GEDCOM file, you can bring your genealogy
information on a diskette and run it on these computers (from the
diskette). No information is left on the computer when you are finished
viewing your information. Scenario 3 - Placing your genealogy information on an Internet website When it comes time to post your genealogy information on your web page, you have several options:
For more information, download the
GENViewer User Manual and look for "Creating a Self-Viewing GEDCOM." |
Copyright © 2004 MudCreek Software Inc. - Home - Downloads - Order - Contact Us - Mailing Lists

